
Security in communication between services is one of the fundamental pillars for any modern application. With the increasing cyber threats, ensuring that data exchanged between services is protected has become crucial. One of the most robust techniques to achieve this security is the use of mTLS (Mutual Transport Layer Security).
mTLS (Mutual Transport Layer Security) is an effective technique to mutually authenticate clients and servers, ensuring the integrity and confidentiality of communications. Azure Key Vault simplifies the management of mTLS certificates, providing a secure and efficient way to store, import, and manage these certificates.
What is mTLS?
mTLS is an extension of the TLS (Transport Layer Security) protocol, widely used to secure communication between clients and servers on the internet. While TLS traditionally ensures that the server is authenticated by the client, mTLS goes a step further, authenticating both sides of the communication. This means that both the client and the server need to present and verify digital certificates.
How Does mTLS Work?
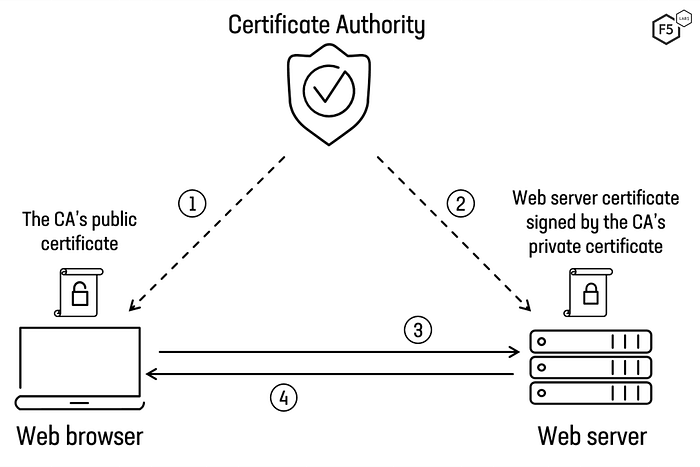
The mutual authentication process in mTLS involves several steps:
- Initial Handshake: When a client attempts to connect to a server, both initiate the TLS handshake process.
- Server Certificate: The server sends its digital certificate to the client, proving its identity.
- Client Certificate: Instead of only the server being authenticated, the client also sends its digital certificate to the server.
- Certificate Verification: Both sides verify the received certificates against a trusted Certificate Authority (CA).
- Session Establishment: After verification, a session key is generated to encrypt the data exchanged during the session.
Benefits of mTLS
- Strong Authentication: mTLS ensures that both sides of the communication are authenticated, reducing the risk of spoofing attacks.
- Data Encryption: All exchanged data is encrypted, protecting against interceptions.
- Data Integrity: Ensures that data has not been altered during transmission.
- Prevention of Man-in-the-Middle (MitM) Attacks: By authenticating both sides, it becomes extremely difficult for an attacker to insert themselves into the communication.
Implementing mTLS in Your Applications
Implementing mTLS may seem like a complex task, but with the right tools and practices, the process becomes more manageable. Here are some steps to get started:
- Certificate Management: Use a Public Key Infrastructure (PKI) to manage and distribute digital certificates.
- Server Configuration: Configure your server to request and verify client certificates. Servers like Nginx, Apache, and application servers like Kubernetes support mTLS.
- Client Configuration: Configure your clients to present certificates to the server. Tools like OpenSSL can be used to generate and manage these certificates.
- Certificate Rotation: Establish a regular process for certificate rotation, minimizing the risk of compromise.
Common Use Cases
- Microservices: In microservices architectures, mTLS can ensure the security of internal communications between services.
- Sensitive APIs: For APIs handling sensitive data, mTLS offers an extra layer of protection.
- Database Connections: Authenticate both the database and the client, ensuring that only authorized clients can access the database.
Challenges and Considerations
While mTLS offers robust security, there are some challenges to consider:
- Certificate Management: Keeping certificates up-to-date and managing their distribution can be complex.
- Compatibility: Not all clients or servers support mTLS natively.
- Performance: The additional authentication process can introduce a slight latency in communication.
Key Features of Azure Key Vault
- Secrets Management: Store and access passwords, access tokens, and other secrets securely.
- Key Management: Create and control cryptographic keys used to protect data.
- Certificate Management: Simplify the process of acquiring and renewing SSL/TLS certificates.
- Auditing and Monitoring: Track the usage and access to secrets with detailed logs.
- Granular Access Control: Utilize role-based access control (RBAC) policies to manage permissions.
How Does Azure Key Vault Work?
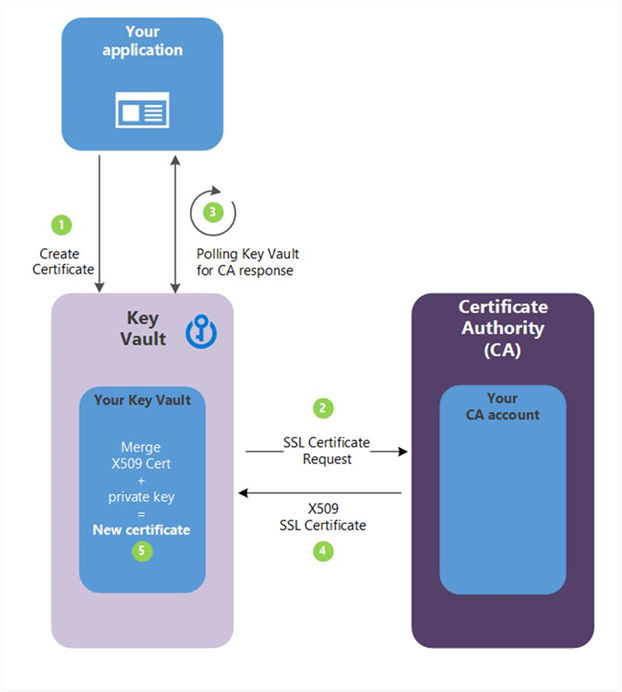
Azure Key Vault functions as a digital vault where you can store and manage secrets, keys, and certificates. Here are the key components and workflow:
- Vault Creation: Create a vault in Azure to store your secret items.
- Secrets Storage: Add secrets, keys, and certificates to the vault.
- Access Configuration: Define access policies to control who can access or manage items in the vault.
- Integration with Applications: Utilize Azure APIs and SDKs to enable your applications to securely access the secrets.
Benefits of Azure Key Vault
- Enhanced Security: Secrets are stored in certified hardware security modules (HSMs), ensuring protection against unauthorized access.
- Scalability: Integrated with Azure, Key Vault offers high availability and can scale as your needs grow.
- Simplified Secrets Management: Centralizes the management of secrets, keys, and certificates, making control and administration easier.
- Compliance: Helps meet compliance requirements by maintaining detailed audit logs.
- Automation: Automates certificate renewal and key rotation, reducing administrative overhead.
Common Use Cases
- Database Credentials Storage: Store database access credentials in Key Vault and retrieve them at runtime.
- SSL/TLS Certificate Management: Simplify the acquisition and renewal of certificates for your web applications.
- Encryption Key Protection: Store and manage keys used to encrypt sensitive data.
Importing and Managing mTLS Certificates with Azure Key Vault Using Node.js
We will explore how to use Azure Key Vault to import and manage mTLS certificates with a Node.js application.
Initial Setup
Before getting started, you need to:
- Set up an Azure Key Vault: Create a Key Vault in the Azure portal.
- Set up a Managed Identity: If your application is running on an Azure service (such as Azure VM, App Service, or AKS), set up a Managed Identity to access the Key Vault.
Installing Dependencies
First, install the necessary libraries:
npm install axios @azure/identity @azure/keyvault-certificates @azure/keyvault-secrets
Example Code
Below is an example Node.js code that fetches an mTLS certificate from Azure Key Vault and imports it:
const { CertificateClient } = require('@azure/keyvault-certificates');
const { DefaultAzureCredential } = require('@azure/identity');

/**
 * Main function to import a certificate to Azure Key Vault.
 */
async function main() {
  // Get default Azure credentials.
  const credential = new DefaultAzureCredential();

  // Your Azure Key Vault name.
  const keyVaultName = 'your-key-vault-name';

  // Your Azure Key Vault URL.
  const url = `https://${keyVaultName}.vault.azure.net`;

  // Create a client to manage certificates in Azure Key Vault.
  const client = new CertificateClient(url, credential);

  // Secret name where the certificate will be imported.
  const secretName = 'your-certificate-name';

  // Certificate to be imported (PEM format).
  const certificate = `-----BEGIN CERTIFICATE-----
MIIDXTCCAkWgAwIBAgIJANr3uZqBZ0KtMA0GCSqGSIb3DQEBCwUAMEUxCzAJBgNV
BAYTAkFVMRMwEQYDVQQIDAoyMDAwMDAwMDAxMREwDwYDVQQHDAhNZWxib3VybmUx
...
-----END CERTIFICATE-----
-----BEGIN PRIVATE KEY-----
MIIEvgIBADANBgkqhkiG9w0BAQEFAASCBKkwggSlAgEAAoIBAQDd7+gqlso5VHYB
...
-----END PRIVATE KEY-----`;

  // Encode the certificate in base64.
  const base64EncodedCertificate = Buffer.from(certificate).toString('base64');

  // Define the policy for certificate import.
  const policy = {
    issuerName: 'Unknown',
    contentType: 'application/x-pem-file',
    keyProperties: {
      exportable: true,
      keyType: 'RSA',
      keySize: 2048,
      reuseKey: false,
    },
  };

  try {
    // Import the certificate to Azure Key Vault.
    const certificateBundle = await client.importCertificate(secretName, base64EncodedCertificate, {
      policy: policy,
      enabled: true,
    });

    console.log('Certificate imported:', certificateBundle);
  } catch (error) {
    console.error('An error occurred:', error);
  }
}

// Execute the main function.
main().catch((error) => {
  console.error('An error occurred in the main function:', error);
  process.exit(1);
});
Important Details
- Client and Credential Setup: DefaultAzureCredential is used to automatically obtain credentials from different sources, such as environment variables, Azure Managed Identity, etc. CertificateClient is the client for certificate operations in Azure Key Vault.
- Vault Details Definition: keyVaultName and url are configured based on the name of your Key Vault.
- Certificate in PEM Format: Replace the content between —–BEGIN CERTIFICATE—– and —–END CERTIFICATE—– and between —–BEGIN PRIVATE KEY—– and —–END PRIVATE KEY—– with your own certificate and private key.
- Base64 Encoding: The certificate is encoded in base64 to be compatible with Azure Key Vault.
- Certificate Policy: We define the certificate policy, specifying properties such as key type (RSA), key size (2048), whether the key is exportable, etc.
- Certificate Import: We use importCertificate to import the base64-encoded certificate to the Key Vault.
- Error Handling: Errors are caught and logged for debugging.
Example Code for Viewing Certificate and Private Key Below is an example of Node.js
code that retrieves an mTLS certificate from Azure Key Vault and restores it for a request:
const { DefaultAzureCredential } = require("@azure/identity");
const { SecretClient } = require("@azure/keyvault-secrets");
const https = require("https");
const axios = require("axios");

/**
 * Main function to view a certificate from Azure Key Vault and make an HTTPS request.
 */
async function main() {
  // Get Azure default credentials.
  const credential = new DefaultAzureCredential();

  // Your Azure Key Vault name.
  const keyVaultName = 'your-key-vault-name';

  // Your Azure Key Vault URL.
  const url = `https://${keyVaultName}.vault.azure.net`;

  // Create a client to manage secrets in Azure Key Vault.
  const secretClient = new SecretClient(url, credential);

  // Name of the secret where the certificate is stored.
  const certificateName = 'your-certificate-name';

  // Get the secret from Azure Key Vault that contains the certificate.
  const secret = await secretClient.getSecret(certificateName);

  // Extract private key and certificate from the secret value.
  const privateKey = secret.value.match(/-----BEGIN PRIVATE KEY-----[sS]+?-----END PRIVATE KEY-----/)[0];
  const certificate = secret.value.match(/-----BEGIN CERTIFICATE-----[sS]+?-----END CERTIFICATE-----/)[0];

  console.log("Private Key:", privateKey);
  console.log("Certificate:", certificate);

  // Configure HTTPS agent with the certificate and private key.
  const httpsAgent = new https.Agent({
    rejectUnauthorized: false, // Self-signed certificate
    cert: certificate,
    key: privateKey,
  });

  // Create an Axios instance with the configured HTTPS agent.
  const axiosInstance = axios.create({
    baseURL: "https://your-api.com", // Make sure to use HTTPS for a secure connection
    httpsAgent,
  });

  // Make a GET request to the API.
  const response = await axiosInstance.get("/register");

  console.log("Response:", response.data);
}

// Run the main function.
main().catch((error) => {
  console.error("An error occurred:", error);
  process.exit(1);
});
Important Details
- Certificate Visualization: We use regular expressions to extract the private key and certificate from the secret value obtained from Azure Key Vault.
- HTTPS Agent Configuration: We use the https.Agent class from Node.js to configure an HTTPS agent with the certificate and private key.
- Axios Instance Creation: We configure an Axios instance with the HTTPS agent we just created to ensure that the HTTPS request is made correctly.
- Request to API with Axios: We use the Axios instance to make a GET request to the API.
This code assumes that the API is available via HTTPS and accepts self-signed certificates. The use of rejectUnauthorized: false may be suitable for development environments, but remember to remove it in production environments to ensure communication security.
Conclusion
Implementing mTLS may seem daunting at first, but with the right approach, its benefits in ensuring the security of communications between services are undeniable. This example demonstrated how to import certificates into Azure Key Vault using Node.js, ensuring secure storage and management while leveraging advanced features such as HSM protection and certificate rotation automation.
By opting for Azure Key Vault to manage mTLS certificates, you ensure enhanced security for the certificates, stored in an environment protected by HSMs. Additionally, centralized management simplifies IT operations, while automation of critical tasks reduces the risk of security breaches. This not only strengthens compliance with policies and regulations but also provides a strategic and effective approach to ensuring data security in an environment where safeguarding information is paramount.
Stackademic 🎓
Thank you for reading until the end. Before you go:
- Please consider clapping and following the writer! 👏
- Follow us X | LinkedIn | YouTube | Discord
- Visit our other platforms: In Plain English | CoFeed | Venture | Cubed
- Tired of blogging platforms that force you to deal with algorithmic content? Try Differ
- More content at Stackademic.com
Using Azure Key Vault mTLS Certificates in Node.js was originally published in Stackademic on Medium, where people are continuing the conversation by highlighting and responding to this story.